People have been asking me for a lantern shell autopsy for quite some time, and this month I finally got my hands on one of these shells. This is an effect you don't really see that often, probably due to the fire hazard that results when the lantern fails to open. The effect looks like a big ball of light that lingers in the air, and looks really neat when many are fired at once. They can be made in any color you want, with red and white being the most popular.
While the shell label reads "Red Lantern," the "lantern" is really just a parachute rather than something resembling a genuine Chinese lantern. When viewed from the ground, however, you really can't tell the difference. A red flare is suspended up inside the chute in order to illuminate it, and the parachute is colored red as well.
Although this is an autopsy report, I have supplied enough pictures, diagrams and measurements to give you a good chance of reproducing something like this on your own. The most difficult problem to get around would be finding the proper material for making the parachute. Plastic can not be used due to the risk of melting, and most common grades of tissue paper are not strong enough to work without tearing. The parachute found in this shell is made from a thicker quality of gampi tissue paper and is quite strong while still being thin enough to fold up into a compact package. About the only substitute that would work equally well is thin cloth like a linen sheet. But I don't want to get any angry phone calls from your wife complaining about a five foot diameter hole in your bed linens, so control the urge OK?
The shell examined here is a 7" ball shell, which is an unusual size. The parachute could probably be scaled down slightly and fit into a 6" shell to make firing it easier, or scaled up and packed into an 8" shell for that matter. I doubt the lift or burst charges would need to be altered in either case.
Construction:
This shell is pretty unconventional from anything I've seen, although this is the first Horse Brand shell I've dismantled so maybe they are all built this way. The outer lift covering is not made from pasted paper, rather it is just a few dry turns of recycled kraft glued onto the shell. The leader is not glued to the shell at all, instead it is tied off to the time fuse to prevent it from pulling out. A separate segment of piped match is tied off on the other time fuse, which runs into the lift bag as seen in Figure 2. The lift bag is a plastic bag filled with 4FA that is then bagged again with a gampi tissue paper bag. Why this outer paper bag is used I have no idea. The time fuses are slurry primed on the ends, and a length of paper Chinese fuse is wrapped around them. The whole lift assembly seems more convoluted than necessary, but to each his own.
The amount of lift used for this shell, 162 grams of 4FA, is about three times more than the ounce per pound of shell weight rule would predict. This is one of those special cases where the ounce per pound rule does not work for calculating the lift charge, as this 852 gram shell is exceptionally light for its size. However, even if the shell was filled with stars and weighed a standard amount, the lift being used here is still a bit higher than usual. Since the 6 second time fuse also burns a bit longer than would be expected for a shell this size, we can surmise that this shell is breaking a lot higher than the standard height for a six or seven inch shell. This is no doubt to allow the parachute a good distance to fall before the chute actually opens. There is six seconds of delay before the flare even ignites, so we can assume a free-fall of somewhere around that time before the chute even opens.
The pasted casing on this shell was very minimal, resulting in a weak casing that provides little resistance to the burst charge. The pasted paper was also a cheap recycled variety compared with the typical virgin kraft most Chinese shells use. The goal is to pop the shell open with as little force as possible so that no damage is done to the parachute.
The location of all internal components is seen in the diagram below. The burst charge is located at the opposite end as the parachute, with lots of fire barriers between them.
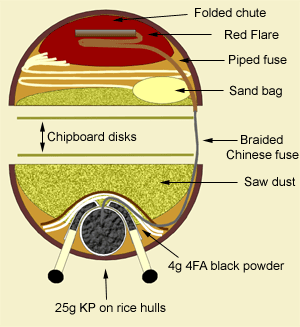
Examining the burst side first, we find a chipboard disk placed over a thick clump of sawdust that has been packed into a tissue paper liner. The bag of sawdust is easily removed to reveal a tiny burst charge sitting in the bottom of the shell, as seen in Figure 5. The burst bag is covered with a scrap of 40 lb kraft paper, followed by two sheets of gampi tissue paper. Figure 6 shows the burst bag sandwiched between two powder filled tubes of tissue paper. The tissue sleeves are glued to the ends of the time fuse and are packed with 4FA black powder. The ends of the sleeves are left empty so that they can be tied in a knot above the burst bag to secure it in place. Note that gampi tissue is strong enough to allow knotting like this, whereas typical wrapping tissue would be torn if this were attempted.
The burst bag is filled with 25 grams of KP coated rice hulls, which are the Chinese style rice hulls that resemble the puffed rice cereal more than the domestic rice hulls sold in the states. A long strand of double braided Chinese paper firecracker type fuse runs from the burst bag into the other hemisphere, where it runs through a 26 inch long piece of quickmatch pipe that leads to the red flare embedded inside the folded up parachute.
Like everything else in this shell, the fusing going to the red flare is a strange apparatus. The braided paper fuse runs all the way through the paper tube and then ties off onto the end of the flare, as seen in the diagram below. A small strand of thick black match is located at the mouth of the piped match, but only runs about six inches into the tube.

The paper type fuse is only slightly accelerated when piped, unlike the dramatically accelerated burn rate of piped black match. It takes the paper fuse about six seconds to burn through the entire length of the paper tube, which creates a desired delay so that the flare doesn't ignite before the chute opens. The paper parachute is not flame resistant at all, so any timing mishaps will result in an airborne fire followed by a burning red flare on the ground somewhere.
Another advantage of the paper type fuse is that it doesn't blow the match pipe apart while burning through it. Since the paper pipe is tightly folded up into the paper parachute, the chute would be damaged if the pipe burst apart and shot flames out everywhere.
As we all know, paper firecracker fuse is notoriously unreliable. In fact, when I lit the paper fuse to do the timing tests for this autopsy, it fizzled out before reaching the pipe. Building a parachute is a lot of work to have it float to the ground unseen by anyone! A more reliable design would be to tie in a piece of time fuse at the mouth of a standard piece of quickmatch, so that it won't even take fire until after the chute is open. This also gets rid of the problem of trying to find or make a 30" long piece of paper firecracker fuse!
Parachute Construction
Next we'll look at the construction of the parachute. As previously mentioned, the parachute is made from a rather thick grade of gampi tissue. Several sheets are glued together at the edges, then a large 64" diameter circle is cut from the sheet. This circle is then reinforced with thin string glued into the paper in the pattern shown below. A continuous rim of twine is hemmed into the edge of the chute, then an inner circle of string is added at the crown by sandwiching the string between the chute and a 1/2" wide "tape" of gampi tissue that is glued down over top of it. Then eight load bearing strings are run from the edge of the chute to the center ring, as seen in the patter below. These tapped strings reinforce the chute so that it doesn't tear during the stressful jolt upon opening.
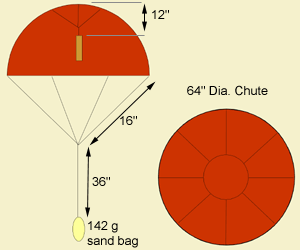
Sixteen strings are tied around the perimeter and tied together at a single point. A small bag of sand is then suspended on a long string from this point, which serves to pull the chute down with enough force for it to open during free-fall.
A 3/8" diameter flare that burns for about 27 seconds is then suspended inside the chute by four strings that attach to the crown loop. The flare hangs down about a foot from the top of the chute, which keeps it inside the canopy rather than hanging down below.
The entire chute is dusted with what appears to be talcum powder, which is done to help prevent the tightly compacted folds of paper from sticking together when it is time for the chute to open.
Loading the Chute
We will analyze the autopsy in reverse here to get a clearer picture of how the parachute was loaded. First the chute is probably hung from the crown so that the strings and sandbag hang down towards the ground. The paper is then folded similar to an umbrella, organizing the folds as seen in Figure 14. Once the chute is worked into a tight bundle, it is then folded up like an accordion as seen in Figure 12. Small scraps of kraft paper are placed between each fold, presumably as an additional aid to prevent the paper from clumping together.
The tight wadding of paper is then loaded into the hemisphere as seen in Figure 11, with the strings and piped match coming out the top. Note that this chute was really packed in quite tightly, such that it just stayed in a compressed block when removed from the shell. It is surprising that this thing even opens when dropping through the sky, as it took a bit of effort to pry the clumped paper apart. Perhaps there were problems with these chutes not opening and that's why this poor shell is here on my table, all chopped up, instead of being fired by the original owner!
Several disks of 40 lb kraft paper are used to finish packing the shell. The first disk is placed over the chute, then the strings are run across the disk. Another disk is placed over the string, then the string is run back across again. A third disk is placed over the string, then the sandbag is put in place. These disks presumably play some role in preventing entanglements with the strings when the contents pop out.
Finally another gampi tissue liner is placed in the remaining space and filled with sawdust. There isn't much empty space left in this half of the shell, so not much sawdust is used. The tissue is closed over the sawdust and then a final chipboard disk is placed on top.
There you have it, the elusive Red Lantern shell revealed!